
- Get link
- Other Apps
While you'll find some Kindergarten level lessons on my main blog, here you'll find a lot of collected resources. I have spent time teaching Pre-K kids in the art classroom as part of my regular schedule, but have also done a fair amount of lessons with parent-child combos of young kids of mixed ages. I love these little learners and I hope you'll find some of my ideas useful!
 Fine Art Connections to the Line theme

Many more art teachers are seeing preschoolers in the art room as part of their regular schedule. I’ve seen a lot of questions regarding pre k classes pop up in art teacher forums. Most of these are along the lines of, Just what DO I do with preschoolers? So I’m going to be sharing a series of posts with lessons and class formatting ideas for preschool success in the art room! This first post will cover how to structure the pre k art class.
My classes are 30 min long, which I find is the perfect amount of time to discuss an idea, explore it with art materials and have clean up time. However, if you have longer time slots, I will give you some ideas on how to use it wisely!
I recommend that art teachers dip into the vast world of preschool blogs. And there are a ton! Really amazing resources with recipes, songs, rhymes and “science experiments”. It’s really great stuff to enhance your lesson. Just as you might bring in a social studies element or read a book to extend a lesson with you K-5 students, you can bring in extra curriculars to pre k.

Format the Class
As you know, children love consistency. Using that knowledge, create a class format andstick with it. Small children will pick up on the routine after just a few classes and your year will be much smoother. Most likely, preschoolers will not be able to make art for thirty minutes so create a structure of introductory activities that work for you! This is the routine I like to use, and I admit that I took most of this from the media specialist after watching her teach a class.
-
Gather at the same spot each class
-
Use an opening/welcome song
-
Ask some questions on our topic
-
Ex. What is the weather like today? or What other kinds of weather are there?
-
-
Mystery box reach in (contains clue for our book/topic for the lesson)
-
Read-a-loud book
-
Show art supplies and process we will use (on a tray)
-
Students go to art tables which are set up to create
-
While students create, aide and I walk around to write names
-
Students bring their work to drying rack
-
A separate table station has extension activity or sensory exploration
-
Clean up Time! Students wash their hands if necessary
-
Goodbye Song
It may seem like this is a ton of activity for thirty minutes and...you’re right! Little artists generally move very quickly through the activities. That’s okay. It’s not that they don’t care, but young children live in the moment! It will be very different from teaching your other classes, but really fun if you can embrace it.
Here are a few of my favorite preschool blogs. There are so many great resources, but this can get you started.
mericherry.com
playtolearnpreschool.com
growingajeweledrose.com
artbarblog.com
 Is preschool art part of your scheduled classes this year? They’re tiny, they’re cute and...um...what exactly can I do with them in the art room? I’m here to give you some ideas on lessons and structure for those 2, 3 and 4 year olds (yes, I’ve had students as young as 2!) in art class.
Last week I wrote about using a structured format for each class. This is certainly not my invention. It can be observed in any early childhood room working brilliantly. So why not take that idea and run with it?
This week I want to share two painting lessons with you. My goal with pre k classes is to stay away from the more crafty projects and really embrace exploratory mark making, art tools and the idea of process. However, I still want my time with the students to have structure. I use a topic theme to have students begin to make connections between their art and the world around them.
Blue Skies Smiling at Me...
This lesson was built around clouds as a theme. We began with our song, and discussion questions about the weather. We happened to have had a very overcast week in my area leading up to this class so it was a perfect discussion topic. Students were asked what kinds of weather can come out of the clouds and were eager to reply with rain, snow, lightning/thunder.

A mystery bag includes a tactile clue on our theme each week. So this week, a bit of polyfil stuffing was my cloud. Little ones reached into the bag without looking to feel and squish the clue before the storybook.
Our read aloud for this lesson was Little Cloud, by Eric Carle. I really enjoy the brush strokes in Eric Carle’s illustrations and was sure to point this out to students.
After our book, I showed the children our art supplies for the main activity and the prints I pulled as art connections. Surrealists were a fun connection to clouds, so I included a Magritte work and more modern magic realism artist, Rob Gonzales. I also had a cloud cutout with cotton applied to it as one more tactile element to reinforce the lesson theme.
 Tables are set with light blue paper and tempera paints:
-
Blue
-
Black
-
White
-
Turquoise
The children had a wonderful time swirling and mixing the paint colors on their paper. After about five minutes, I put out dishes with cotton balls and some cut up quilt batting scraps I had. Students had the option of pulling apart the cotton and glueing it on with squeeze glue bottles. This is lots of fun for little ones!

When they’re done, students bring art to the drying rack and can move on to the extension activities. In this lesson that was sensory tables. For this lesson, I had one in the back set up with shaving cream on it. It’s super fun to ‘draw’ in the shaving cream and squish it between your fingers. If you don’t want to put it right on the table for clean up reasons, I suggest a tray like a large finger painting tray or a plastic tablecloth. Either could be quickly swept away before the next class.
Other ideas for extension activities or sensory tables on this theme are:
-
Microwaved ivory soap (have you tried this?! It expands into a puffy cloud when heated) Keep it in a bin during play exploration
-
Crumpled tissue collaged onto shape (with glue or contact paper)

Then of course clean up time. This lesson is actually pretty easy because the shaving cream is their soap, they really just need to rinse. Then the class closes with a goodbye song. I’ve used different songs from year to year. Here’s one I used called A,B,C You Later on YouTube. It has a fun sign language component to it too, which means more great ways to build fine motor skills and make brain connections.
Ice Play
Another fun painting lesson for preschool is this ice cold goodness. This involves more prep, but is really fun for kids. It’s still hot here in Nashville, so this was something we have gone outside to do. However, you can absolutely make this work inside too.
Our opening song was followed by a discussion about hot and cold. The children reached into the mystery bag to blindly feel an ice pack and showed me how they shivered.
Art displayed:
-
Photograph of snowy mountain
-
Monet: The Magpie
-
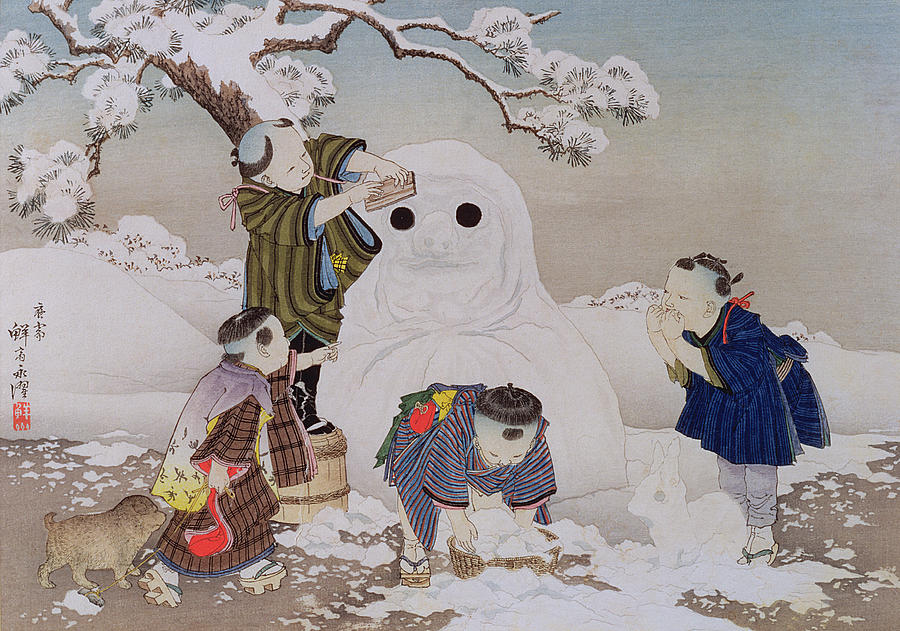
Kobayashi Eitaku: The Snowman
-
Kandinsky: Black Lines I, 1913 (to connect with our color usage)

Our read aloud book with this lesson was called, Snowball Moon. by Fran Cannon Slayton If the students are a little older, 4’s, I might choose a book like, Ice Boy. by David Ezra Stein instead.
Maybe you’d like to use this at the end of class instead of the beginning while you clean up! Videos are great for those times when we need to multitask. I found a read aloud video of Ice Boy on YouTube, which you can see right here. It’s about four minutes long.
Next, I quickly showed our art materials at our carpet area before students went to tables to experiment with the ice paints.
At first the paints were stiff, but quickly melted. It was interesting to observe who really loved to hold it and move it around and who played avoidance. Having popsicle sticks frozen into the cubes helped those who were more reluctant. After painting, children were invited to draw into their work with oil pastels.
Next time I would do this activity as a mono print by having the students draw with the melted ice paint on the table. By laying a paper over the top the students would print it. I think that might make the process a little more exciting with a cool reveal.

The mono print & 'plate' I quickly turned out right before clean up!
Extension Activities
-
Wooden beads frozen into ice placed in tub
-
Children melted the ice with turkey basters and squeeze bottles of warm water and salt water.
-
-
Cold Dough refrigerated play dough or homemade dough.
-
“Cold” potato game. Play ‘hot potato’ as a closing game but with the ice pack.

Although this activity requires more prep work in making and freezing the ice paint, it was such a great sensory experience for the children!
Keep coming back for more Preschool Art Ideas. Next week I’ll be sharing multiple activities on line and shape as we go on to explore more three dimensional materials and work on scaffolding scissor skills! Thanks for reading!

-----------------------------------------------------------
Today I am sharing a whole bunch of artist connected early childhood lessons- great for Kindergarten and Pre K students.
These are lessons taught in thirty minutes blocks, they can be fast paced and incorporate several materials. Each lesson incorporates a relevant learning topic for Prek/Kinder children as well as a connection to the work of a fine artist.
I really enjoy looking at Art with small children. I find that when asked observational questions, they have great responses and make interesting personal connections to the Art. But these lessons are specifically targeted towards young children and really utilize and build on age-appropriate prior knowledge.
Jasper Johns Numbers and Letters in Art
I can identify letters and numbers 1-10 in Art.
My mystery box clue for this lesson (a box where students get a tactile or auditory clue for the lesson) was alphabet and number fridge magnets. When I revealed the clue, spilling the letters out on to the carpet, students found the letter of their name or the number of their age.

We looked at artworks by Jasper Johns for this lesson noting the use of primary colors and the letters and number viewed in the art. When looking at his painting, numbers 1-10, we had a little fun in counting down from ten to one ending in a “blast off!”. This was an entertaining review in number sequencing for the children. Anyone who was able to count on their fingers also joined in with that.
Something I asked students to look for in each of his artworks was also the use of layering. This is a technique we brought into our own art works as students tore and glued paper (newspaper or other) on their background papers.
They painted those newspaper scraps with tempera paints.

Next, students used sponge letter and number stamps (in regular tempera paint) to print all around their paper.
I also encouraged students to write their own letter or numbers in oil pastel. I found great paper in the scrapbook section of my local arts and crafts store with block letters. The children loved collaging these onto their papers as yet another layer.
We finished off the works with a washi tape border. I happened to find this tape with little numbers all over it that was perfect for our purposes!
Calder Stabiles
I can name the geometric shapes.
This sculptural lesson focused on shape while allowing students to also incorporate fine motor skills of squeezing dough, beading and threading the shapes.
Looking at Calder’s stabiles, we spoke about sculpture as three dimensional. I used the contrast between a flat circle cut from a cereal box and a play ball (with little pictures on it). Showing the cereal box, we noted that it was flat and the “picture” was only on one side. When I held up the little ball, we talked about how sculptures are works of Art that can be viewed from many sides, all around. So when I turned the ball, the children could see that there are little pictures on each side and can be viewed from many sides.
We also talked about the colors and shapes observed on the Calder stabiles and reviewed the name and visual of basic geometric shapes.
To create sculptures, we used cut up egg cartons (into a section of four egg cups). Children pressed play dough (or salt dough) into each cup for weight. Students threaded beads onto pipe cleaners and wires. A few shapes were also threaded on to these pipe cleaners. Students then had the opportunity to place the wires and pipe cleaners into the play dough, bridging them over and across to connect with another egg cup or the center point of the carton. Some students of course loved the spiky look of the pipe cleaners popping up in a straight line! Another fun material used in this artwork was simple aluminum foil sheets. I showed the kids how to crunch and twist them to add to their sculptures!


Next time I do this- I would have the children paint the egg cartons ahead of time. I think they’d look so fun in primary colors. This was a really effective way to address sculpture with these young children.
Keith Haring Body Outlines
I can name my body parts.
With the read-a-loud, I Ain’t Gonna Paint No More, this lesson was off and running. If you don’t know the book, the child is obsessed with painting on his body and the silly, rhyming text takes the reader through each body part that he covers in a rainbow of paint!
I gave the students dry paint brushes and as we read each part of the book, students “painted” their own body parts- for example, ‘Oh, what the heck, gonna paint my neck…’ had the children tickling their own neckline with the brushes!

Viewing the art of Keith Haring, the children noticed right away that the figures seemed to be dancing. They also noticed the theme of friendship and unity! To translate this artist to an art making experience these small artists could connect with, we chose to trace and paint body outlines.
Using only the top half of each student’s body (waist up) allowed my paper to be a bit smaller. I like brown butcher paper on a roll for this kind of thing! We worked together in teams to trace in chalk and then paint in the outline. Last, a black outline was added. Let me just say- before we began this, we clearly went over painting expectations. Even though our silly story book showed painting on your body---please paint only on the paper!
Starry Night in Shaving Cream
I can identify movement in Art.
What a classic piece of art and a great artwork to explore with small children. Our mystery clue this lesson was an auditory clue- Twinkle, Twinkle, Little Star. The children were excited to hear a recognizable tune and began to sing along right away! We talked about night time and seeing the stars and moon when the sky was dark.
 Looking at van Gogh’s art, the kids moved their arms and hands in a swirly, whirly movement to mimic the movement observed in the painting. We connected to that swirly pattern by using a shaving cream marbling technique to create the sky of our artworks.
Children added their version of stars by tearing up shiny foil paper and gluing it down. There were also cypress tree shapes available if they wanted to incorporate them.
Picasso Guitars
I can name parts of a guitar and tell where the sound comes from.
This lesson was centered around music and structure of the guitar. Our mystery clue was of course...a toy guitar. Children played it and held it without any fear of hurting the instrument, and I didn’t have to worry either! We talked about the differences between an acoustic and electric guitar (with visuals of each) and listened to a piece of classical Spanish guitar music. The children learned that the guitar is an instrument from Spain just like our focus artist for the lesson, Pablo Picasso.
Picasso has many wonderful artworks from throughout his career that include the guitar. You can select a few and talk with children about the differences in how Picasso depicts the guitar- a good time to introduce the word, abstraction.
I wanted the kids to have more cutting experience so I incorporated it into this lesson by having students cut the guitar body shape(paper) and strings(yarn). Learning to cut is an important fine motor skill to practice and one I always begin by reviewing how to hold the scissors. My other standard reminder is to keep the elbow in (you can ask the child to hold a file folder or paper under their arm if this is really an issue) and to use their, “helper hand” to turn the paper.

There was also a lot of fine motor practice in the gluing aspect of this lesson as either pressing and peeling papers from the glue sponge or using the squeeze bottles of white glue were part of the process.
Children cut and collaged their guitar pieces knowing that they could make the guitar look real or mixed up just as Picasso had done. And it was okay to do a little bit of both! I had a poster diagraming the parts of an acoustic guitar for parts reference. Students included a body, neck, headstock, tuning pegs, the hole and strings. I really enjoyed how each guitar artwork was different and children were unafraid to tackle the subject matter.
 Wrapping it Up
These are just a few jumping off points as of course, each time I taught the lessons, I tweaked our discussion questions according to the class’ ability. But that’s what I loved about these very open-ended approaches to exposing young children to fine artists. They are in no way meant to copy an artwork. The goal is simply to look, wonder and make a connection.
I work to create a space where the children can relate to the topic in an age appropriate way, always including songs, fingerplays and movement. I’m sure you have your own little tricks and tweaks you make with each class. For anyone who is struggling with teaching lesson that are open ended with young children, give these a try, I’ve found the lessons to be structured enough to please adults and still have many open opportunities for the children to interpret the topics in their own way!
Have fun with those little ones- when you don’t stress, they are a blast!
Thanks for reading.

Process art is a blast, as it is way more open ended. Having a theme to the lesson provides a bit of guidance and a way to tie in fine art connections and read-a-louds, which as I see it, is still guiding students through thoughtful art making according to the studio habits of mind. I'm calling this approach, guided process. The guidance can come in the form of a example or an "invitation to create", but the end product is not emphasized. Students may and will deviate and it creates wonderful variety.
You can’t ditch the prep completely...preschool does involve a lot of prep either way. Because they’re so young, they need to change gears frequently to stay engaged. The structure of a successful preschool art class is something I covered in an earlier blog post, which you can find by clicking right here. What I want to share with you today are a few easy lessons.
I even have a free downloadable and detailed lesson(5 pages) outline for you all! Get your FREE lesson by clicking here.

Now, for even more preschool art lesson ideas! I’ve tried to keep the subject matter of all these lessons relatable to a small child. There are fine art connections to each lesson, but the goal is more exposure than anything else. The focus here is getting the children to explore the art making process through our theme.
-------------------------------------------------------------

Lesson Theme: Lines
Preschoolers can explore a lot about line in a hands on way by using pipe cleaners and yarn as an isolated, manipulative line.
A great book to share with this lesson is, Lines that Wiggle., by Candace Whitman.

 Fine Art Connections to the Line theme
There are two parts to the art creation aspect of this lesson. The first is stamping with the edge of a cardboard rectangle. This creates prints of straight lines that can be arranged in anyway the students choose.
Also a great opportunity to discuss vocabulary like, vertical, horizontal, diagonal and overlapping.
The second technique is to arrange yarn, chenille stems and thin paper strips on contact paper. Just a small piece of contact paper will do. The hardest part is peeling it all! *tip peel just the corner ahead of time.
I like to use contact paper for my very beginning artists before we have covered introductory glue skills.
All the basic skills must be scaffolded with the preschoolers. This is something to be seriously considered while planning the lessons ahead.
Students can flip the contact paper onto their line prints themselves as soon as they are done. The paint dries very quickly from the prints and it’s important for them to experience the melding of these two line pieces. It’s also very fun and great tactile experience to feel the yarn through the contact paper!

art from students 2-4 years old
Early Finishers are the real deal with Pre K artists! Ha! So be prepared with an extension activity like this one:

Develop scissor skills by practice cutting play doh ropes. Play doh scissors or safety scissors are perfect for the youngest kids to use for this when you can’t necessarily supervise the whole time (you could still be working with students on the yarn and contact paper). However, regular scissors are fine too and they are not harmed by the play doh.
Lesson Theme: Hats
Although this theme may seem too broad, it’s appropriate for this age as they are often discussing subjects such as community helpers and dressing for the weather in their classrooms. These are easy discussion topics you can bring into your lesson introduction. If you can, work with the classroom teacher to have the students wear a dress up hat to class that day to further encourage discussion and have some examples on hand.
As my fine art connection for this lesson, I took out all the prints I had with people in hats. Renior, Cassat and Matisse were some good artists to look at for this!

In consideration of scaffolding the cutting and gluing skills for preschoolers, this lesson focused a little more on the cutting skills and introduced one of my favorite tools- the glue sponge.


kids grasp small piecces and use the glue sponge four year old student in her hat creation
Students are given a long strip of paper about six inches in width. They work on cutting one side of the paper. If you wish, you could draw a zig zag or wavy line for the older students to cut on (good for four/five year olds). For the youngest students, just allow them to cut lines all along one side,
Glue sponges! If you don’t know about these beauties all you really have to know is:
-
Glue
-
Kitchen sponge (no scrubber pad)
-
Plastic sandwich container
To work on the pincer grasp, put out a tray of small items like little foam shapes and shiny paper for the students to glue onto their hats.

As a finishing touch, feathers are a fun addition to the top. Just one or two are quite thrilling for the kids. Then it gets measured around their heads and stapled together.
Early finisher ideas:
- use play doh to make hats for figurines
- use the hats to play the hat hokey-pokey while students are in line to exit
- There's another Jon Klassen book about hats called, I Want My Hat Back., which might be a nice closing.
- have a hat parade around the room, play some fun marching band music to set the mood!
Click here to head over to my TPT store and get a copy of this Line Lesson!
Lesson Theme: Dogs
Although you have to be careful not to fall down the, teacher! teacher! let-me-tell-you-about-my-pet rabbit hole with this one, keep the discussion on track and it’s a hit!

2 and 3 year old artists go straight to collage without painting first.
After all, dogs are animals the kids see all the time, no matter where you live and plenty of artists have been inspired by man’s best friend.
A fine art connection made was to artist, Dean Russo.
This lesson is meant to continue the cutting and gluing skill building while incorporating a very tactile material- fabric.
Find a great dog book to read. I personally love, Go Away Dog, by Joan L. Nodset as it addresses the feeling of maybe not liking dogs all that much. I use it to segue into talking about how to approach a dog you don’t know and some common dog behaviors that kids might think of a scary or funny.

Speaking of funny, have you seen the Go Noodle video- Give Your Dog a High Five?
Depending on your time allotment for art creation, students can work at two stations for this theme.

One is painting a dog house. You could use a pre-cut house shape or better yet, let the kids combine a rectangle and a triangle for a house. Students paint the dog house any way of their choosing. My focus here is teaching how to wash and blot the brush in between colors more than how they paint the house.
*tip:Put out all warm colors or all cool colors so it doesn’t matter too much if they mix all the colors anyway.
The second station would be collaging the dog. This could be done right on top of the dog house or a new paper. Using different fabrics makes the choice very engaging and adds the best kind of variety to the student work. When I put out these trays for my students I confess that I had cut all the pieces. Next time I would have the students cut certain parts of the dog by themselves. For example, cutting paper strips (instead of fabric) to use for the dog legs or nose. (Paper rather than fabric as it is pretty difficult to cut for beginners.)

Instead of presenting all the pieces at once, invite the students to choose a head and body from one tray, take that away then present ears and noses on another tray, etc. Embrace the process and really try not to correct any placement. Remember that many small children think of 'seeing' animals from above and may create their dog this way.
Last, washi tape or marker lines can make collars and leashes if the students wish.
Another extension activity I’ve used with this lesson has been to make a model magic bone for the dog (see bottom right photo) The bone is easy! First, roll a small rope and then four little spheres to press directly onto the paper. I’ve found model magic doesn’t usually need to be glued!
That wraps up my three lesson suggestions. But-Don't forget about that free lesson! Hop on over to that download by clicking here for the Donut lesson. It includes a full lesson outline including, fine art connections to share, a read aloud suggestion, rhymes to use with your Pre K kids and extension activities for those early finishers.
And if you are looking for full lesson plans for the above lessons, I have it all for you over at my brand new Teachers Pay Teachers store. With these plans, your work is done. Add in your standards and you're good to go!
As always, thanks for reading and I'd love to hear any input you have on some successful Pre K art lessons for you.